Showing posts with label patterns. Show all posts

Monday, 7 September 2015

I wish I'd thought of that!

One of the greatest things about the Internet is that no matter what you're interested in, somewhere in cyberspace there will be a group of likeminded people to chat to and share ideas with.  There is a Facebook group especially for people who love to make their own cloth pads, and I really enjoy being a part of it.  Whether troubleshooting misbehaving sewing machines or discussing the pros and cons of different fabrics, this group of friendly, creative women help each other to create fabulous cloth pads.

Apparently, a lot has happened in the cloth pad world since I took a break from it for a few years.  Here are some things I have learned:

- Reusable menstrual products are now widely known as RUMPs.  How did it take so many years for someone to think of this?!
- People are making their own underwear using a pattern called "Scrundies", and they look amazing.
- Penis pads are a Thing.  Menstrual pads.  In the shape of penises.
- Also vulvas, teddies, sharks, owls, Batman.  Pads are no longer just pad shaped!
- You can now buy snaps in the shape of hearts and stars.
- HOW many different types of menstrual cup?!

Sometimes people post pictures of pads they have made using the Luna Wolf patterns, and seeing those makes my heart do a little happy flip.

A couple of people have done some really clever, creative things with the patterns, and I am sharing them here with their permission (thanks, ladies!).

Ranela De Guzman came up with a way of cutting out the pattern so that she can trace the cutting line, sewing line, AND core stitching line, all within the same template:


I just love how clever this is.  Everything is already perfectly aligned, centered, and ready to draw around.  I have seen templates cut out on both the cutting and sewing lines, but they always looked flimsy, and I wondered how they would keep their shape.  Including the core stitching guide in the template anchors and stabilises it, totally solving this issue, while having the guide ensures the core stitching is always in the perfect place in relation to the edges of the pad. This is one of those gamechanging ideas that I wish I had thought of, and I can't wait to try it myself!  (Picture by Ranela De Guzman.)

Siena Snedeker adapted the 9" pattern to create a "pocket and insert" style pad, cutting the top and bottom off the template to form the pockets:
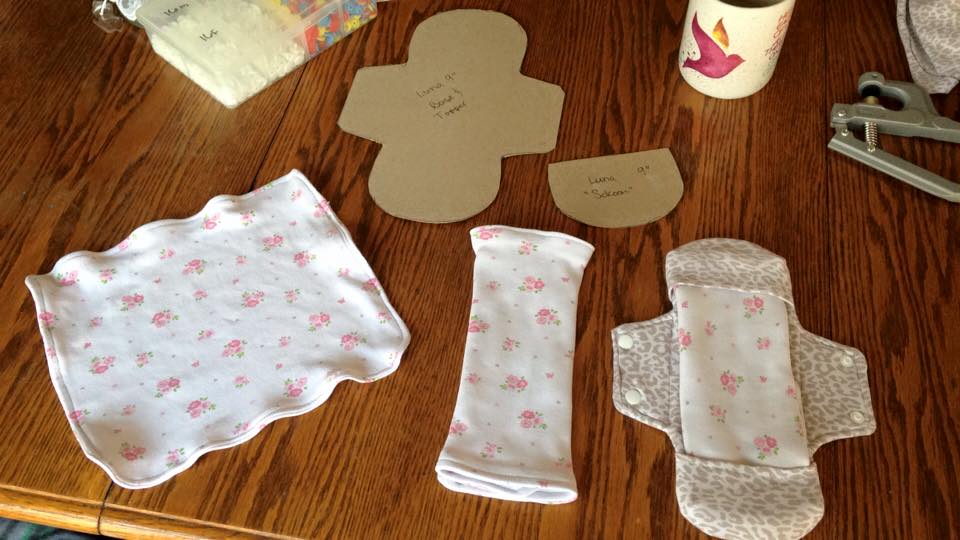


She repurposed an old swaddle blanket for the foldable inserts.  You could also make a couple of serged cores to use as inserts, and vary the number used to increase/decrease absorbency.  I can see this working really well for a heavy flow if you used PUL backing, and instead of changing the whole pad, you could just change or refold the insert.  I want to make a couple of these to wear to work on my heavy days so I don't have to fit a whole load of AIOs in my bag, just a few inserts.  I'm really looking forward to trying this!  (Picture by Siena Snedeker.)

Thank you so much ladies for letting me use your images and share these cool ideas!

Sunday, 23 August 2015

Tutorial: How to make a pad with an overlocked (serged) exposed core

Exposed cores are a great way of adding a bit of variety to your pad stash.  You may have already seen my tutorial for a 4-layer exposed core pantiliner.  This tutorial is for a heavier duty pad with an exposed core.  Unlike the pantiliner tutorial, you do not stitch through the whole pad when adding the exposed core.  This prevents blood from wicking through the stitches and going through your pad.  I'm using polar fleece as a backing in this tutorial, but PUL would work great too.


This post assumes that you have already downloaded and are familiar with the Luna Wolf patterns/tutorial set with templates and instructions - if not, you can find it here.

First, cut out the layers of fabric you will be using for your core.  I do this by cutting out rectangles just slightly bigger than my core template.  Here, I have used two layers of bamboo fleece and one layer of patterened flannel. 


Stack these pieces of fabric, making sure that the fabric you want on the top is right side up.  Pin in the centre - you don't want the pins anywhere near the edges where the overlocker will be cutting.


Draw around your core template with a water-erasable or air-erasable pen.  This line will be visible on the finished pad, so you will want something that will wash out.


Using the line as a guide, overlock/serge around your core.  Don't worry about the tail, as this can be tucked in underneath the core later.  If you don't have an overlocker, you can use zigzag stitch just inside the line, and then trim the excess fabric with scissors (see the Luna Wolf patterns/tutorial set for instructions/photographs).


Cut out your backing pieces.  I used flannel on the top, and polar fleece on the bottom.  Pin your core right side up to the right side of the piece you want facing upwards - in my case, the blue flannel - tucking the tail underneath.  Stitch the core to this piece only.  I stitched around the edge of the core, just inside the overlock stitch.  Now place your topping and backing fabrics right sides together.  The core will be sandwiched inside.


Sew the topping and backing pieces together as per the Luna Wolf tutorial, leaving a space to turn.  Trim the seam allowance, leaving it longer at your turning space.  Turn the pad right side out, using a knitting needle, chopstick or similar to tease out the corners.  The core is now sitting on top of your pad.  Tuck in the fabric at the turning space, and press.

Topstitch the pad as per the Luna Wolf tutorial.  The trick to this is to keep the foot over the core (see photo below).  If the foot goes underneath, it will bump against the stitches and throw off your line.


Add fastenings, and enjoy your new exposed core pad!


I hope you found this tutorial helpful.  Here are my other tutorials:

Sewing along a guide line
How to make the Luna Wolf patterns longer
How to make a 4-layer exposed core pantiliner

Tutorial: How to make a 4-layer, exposed core pantiliner

The Luna Wolf cloth pad patterns feature hidden cores, but exposed cores are a nice way to mix things up a bit!  Here's how to make a four layer pantiliner with a turned and topstitched core.  (For heavier exposed core pads, please see my tutorial for serged/overlocked exposed cores).


I have used flannel for this liner, and it is suitable for everyday wear, very light flow/spotting, or cup/tampon/sponge backup.  I have used the 8.5 inch pad template, as I prefer slightly bigger liners.

Here's how to make it!

(This post assumes that you have already downloaded the Luna Wolf patterns/tutorial set with templates and instructions - if not, you can find it here.)

Place your core template on the wrong side of your core fabric, and draw around it.  Cut out your core shape half an inch or so outside of your drawn line.  Here is what you should end up with:


Repeat, so that you have a piece of fabric for the back of your core.  Pin these two pieces of fabric right sides together.  On a straight-ish part of the core, mark where your turning space will be.  This should be about 1.5 inches.


Now cut out your backing pieces, and pin these right sides together.


Sew the two core pieces together, and sew the two backing pieces together.  Make sure you leave a turning space.  Trim seam allowance, leaving it a little longer at the turning spaces.  Here's what you'll end up with:


Turn, using a knitting needle or chopstick (or whatever you can find!) to tease out the corners.  Tuck in the fabric at the turning space.  Press, press, press!


Now topstitch the backing part of your pantiliner- the part with the wings.  It'll look like this on both sides:


Pin your core to the centre of your pantiliner:


Now topstitch your core, attaching it to the backing.  You will be stitching through the whole pantiliner.  Add snaps (or alternative fastenings of your choice) and enjoy!


Here's the back of the liner... being all flannel it's reversible, so you can wear it this way around as well!


I hope you found this tutorial helpful.  Here are my other tutorials:

Sewing along a guide line
How to make the Luna Wolf patterns longer
How to make a pad with an overlocked (serged) exposed core

Tutorial: Sewing Along a Guide Line

Most sewing patterns include seam allowance, so that you draw around a template that is larger than your finished item, cut the fabric out on this line, and then sew a specified distance in from the edge of the fabric.  Or you pin the pattern to your fabric and cut around the pattern pieces.

However, pads are often more intricately shaped than other sewn items, and you may find it easier to sew along a pre-drawn line.  If you're having trouble getting your pads looking neat and symmetrical, try this method:

(This post assumes that you have already downloaded the Luna Wolf patterns/tutorial set with templates and instructions - if not, you can find it here.)

First, cut out your template.  However, instead of cutting along the outer line, cut along the inner line.  The template will be the exact size and shape of your finished pad.  In the picture below, I have made a template on clear plastic so I can see the fabric underneath.  Place the template on the wrong side of your topping fabric and draw around it.


Now cut out your pad shape half an inch or so outside of your drawn line.  This is how it will look when you have finished - obviously it will be bigger than your template.


Attach your core to the wrong side of your topping fabric as normal.  The drawn outline will help you centre it.


Cut out your backing fabric, making sure to add seam allowance if you're using the same template.  (You could always print two copies of the templates, and cut out one set on the cutting line, and one set on the sewing line.)  Place the wrong sides together as normal, and pin in place.  Now when you come to sew the pieces together, you will have a nice ink line as a sewing guide.


Tip:  If you find the core is getting in the way and preventing you from turning the corners tightly enough, try using a zipper foot.

Complete your pad as per the Luna Wolf Tutorial - trim seam allowance, turn, press, and topstitch.  Add fastenings and enjoy your pad!


I hope you found this tutorial helpful.  Here are my other cloth pad tutorials:

How to make the Luna Wolf patterns longer
How to make a 4-layer, exposed core pantiliner
How to make a pad with an overlocked (serged) exposed core

Thursday, 23 July 2015

Luna Wolf Patterns Now Available For FREE!

What a week it's been at Luna Wolf HQ!

As you may know from my previous blog posts, I have been having problems with the ongoing theft of my patterns/tutorial set by an Etsy seller going by the name of Happy Moon Pads.  She bought the pattern/tutorial set on 19 April 2014, and shortly afterwards started selling it on Etsy and on her own site, with her business details inserted in place of mine.  She claimed full credit for the 15 page PDF file, even selling a $25 licence for people to sell pads made from the patterns, as long as credit was given to her shop. (You do not need a licence to sell items made from a sewing pattern - this is bogus.)

I reported this brazen theft of intellectual property to Etsy, as did several other people, but Etsy weren't interested.  Happy Moon Pads altered the listing photo to make it slightly less identical, but a year later the original listing is back on Etsy, and people are still unwittingly buying it.

Meanwhile, I had been having terrible problems with my website after attempting to migrate it, and could not get my shopping cart set up correctly to sell the tutorial anymore.  Happy Moon Pads was profiting from my work, and my site was too broken to sell it myself.  Even if I did manage to fix the shopping cart, or broke my Etsy boycott and listed the pattern/tutorial on Etsy myself, I knew that whatever I priced it, she would undercut it and continue to rip me off - and frankly I don't have the time or energy to continue pursuing her.

After much deliberation, I decided the best way forward would be to offer the pattern/tutorial set for free, or for a small optional donation. This is the best way I can think of to stop her from profiting from my work.  You can't undercut free. I have done a complete revamp of my website (the broken shopping cart is gone!), and you can now download both the A4 and US letter versions of the tutorial, plus templates for wider versions of the pantiliner and 8.5 inch pad.  There is a donation button on the website if you like the patterns and want to say thanks. (A massive thank you from me to the people who have already donated!)

Here are the free patterns!

A4 version
US letter version
Wider versions of the pantiliner and 8.5 inch pad

You can help by sharing the pattern/tutorial set with its Luna Wolf branding far and wide, and speaking up if you see it being sold on and/or claimed as somebody else’s. I am happy to provide the original high resolution photographs from the tutorial photoshoot (including the many that didnt make it in!), photographs of the original patterns drafted on cardboard, screenshots of the original tutorial files on my PC date stamped 2009, a screenshot of the Paypal transcation from 19 April 2014 when Samantha Hughes (AKA Happy Moon Pads) purchased the pattern from Luna Wolf, or whatever else it takes to prove this is my work.

If you have previously bought this pattern from Happy Moon Pads without realising it was stolen property, I suggest opening a dispute with Etsy and/or Paypal, although I have little faith in the former.

I have been overwhelmed by the support I have had from the cloth pad community. I wasn't sure how people would react to seeing a pattern they had previously paid for become available for free, but generally people have completely understood and supported my decision, and I am so grateful for that.

Saturday, 2 August 2014

Update on Happy Moon Pads Infringement

As mentioned in my previous entry, an Etsy seller going by the name of Happy Moon Pads was attempting to sell the Luna Wolf cloth pad pattern and tutorial set as her own work.  She was also selling a licence for people to sell items made from my pattern/tutorial set, as long as credit was given to her.

I have evidence of my ownership of this pattern/tutorial set dating back to 2009, when it was created.  The patterns themselves were hand drafted in 2008.  Happy Moon Pads did not exist until 2011, according to her own slogan - "Brightening periods since 2011".

I reported the listing to Etsy, as did several of my friends.  I never did hear anything back from Etsy, which was disappointing, but the offending listing was removed.

Good news, right?  Well, I thought so, until I realised that she'd created another listing.  Different picture, a few edits, but still my text word-for-word in the description.  I have reported the new listing to Esty.  I have yet to determine whether the downloadable product is my work, as that would involve BUYING it, and the thought of giving money to Happy Moon Pads to access my own work makes me feel sick.  I think I'm going to have to bite the bullet and do it though, to ensure I have the evidence I need.

The licence is still for sale, relating to the "new" patterns.

She also has the same listing on her own web site, which I have reported to her web host.

I'm obviously upset (and furious) that this has happened, but equally I have been bowled over by the support of my friends and customers who have added their own complaints to Etsy, and helped spread the word.  Thank you to all of you.

Wednesday, 30 July 2014

Rip-off of Luna Wolf pad patterns and tutorial set

Hi everyone,

It has been brought to my attention that the pattern and tutorial set I created in 2008/9, and still sell through my website today, has been ripped off by an Etsy seller called "Happy Moon Pads".

This is my original pattern and tutorial set:


You can see from the picture that the text on the pattern reads "Copyright Luna Wolf 2008. For personal or non profit use only."

This is the ripped off pattern: [EDIT: this has now been removed and replaced with a different listing - see following update post.]

Screenshots (click to enlarge):


As you can see, it is identical, but the text pertaining to Luna Wolf has been removed. Her price also undercuts mine.  Unbelievably, she is also selling a licence which enables the buyer to sell pads made FROM MY PATTERNS - as long as they give credit to HER SHOP!

PLEASE DO NOT PURCHASE THIS PATTERN/TUTORIAL SET FROM HAPPY MOON PADS! This is MY work, for which I can provide the original hand-drafted patterns if anybody would like to see them.  Please do not give your money to somebody who is making money dishonestly off of somebody else's hard work and creativity.

Etsy has been notified.

Thanks for reading.

Vicky

Tuesday, 6 July 2010

Wider Patterns Now Available

I recently made wider versions of my pantiliner and 8.5 inch pad patterns, for a customer who wanted to make her own but needed more width than the current versions offer. The wider versions close at 2.75" - 3", depending on where you place the snaps.

Anyway, if you've purchased my pattern/tutorial set, and would like to receive the wider versions of those two patterns, I'll be happy to send them to you in PDF format at no charge. Just drop me an email at pads@lunawolf.co.uk, and don't forget to tell me whether you want the patterns to be European A4 or US letter size.

Happy sewing!

Wednesday, 11 November 2009

Patterns, tutorial and snap setting service now available!


It's been a long time coming, but the patterns and tutorial are up at last! You can find them in the DIY section along with my new snap-setting service. (I originally wanted to call it a "snapping service", but thought people might get the wrong end of the stick.)


Strangely, it was getting sick that inspired me to finish it. I can't make pads from my bed, but I can type and use Photoshop! The patterns and tutorial took a lot longer than expected, but I'm really happy with the end result. I can't wait to see the pads people come up with! (Yes, that is a not-so-subtle hint to send me photos.)

Fortunately I'm starting to feel better again, so I'm easing myself back into pad making and hoping the store will look less bare soon. Or at least bare for the right reasons. :)