Monday, 7 September 2015

I wish I'd thought of that!

One of the greatest things about the Internet is that no matter what you're interested in, somewhere in cyberspace there will be a group of likeminded people to chat to and share ideas with.  There is a Facebook group especially for people who love to make their own cloth pads, and I really enjoy being a part of it.  Whether troubleshooting misbehaving sewing machines or discussing the pros and cons of different fabrics, this group of friendly, creative women help each other to create fabulous cloth pads.

Apparently, a lot has happened in the cloth pad world since I took a break from it for a few years.  Here are some things I have learned:

- Reusable menstrual products are now widely known as RUMPs.  How did it take so many years for someone to think of this?!
- People are making their own underwear using a pattern called "Scrundies", and they look amazing.
- Penis pads are a Thing.  Menstrual pads.  In the shape of penises.
- Also vulvas, teddies, sharks, owls, Batman.  Pads are no longer just pad shaped!
- You can now buy snaps in the shape of hearts and stars.
- HOW many different types of menstrual cup?!

Sometimes people post pictures of pads they have made using the Luna Wolf patterns, and seeing those makes my heart do a little happy flip.

A couple of people have done some really clever, creative things with the patterns, and I am sharing them here with their permission (thanks, ladies!).

Ranela De Guzman came up with a way of cutting out the pattern so that she can trace the cutting line, sewing line, AND core stitching line, all within the same template:


I just love how clever this is.  Everything is already perfectly aligned, centered, and ready to draw around.  I have seen templates cut out on both the cutting and sewing lines, but they always looked flimsy, and I wondered how they would keep their shape.  Including the core stitching guide in the template anchors and stabilises it, totally solving this issue, while having the guide ensures the core stitching is always in the perfect place in relation to the edges of the pad. This is one of those gamechanging ideas that I wish I had thought of, and I can't wait to try it myself!  (Picture by Ranela De Guzman.)

Siena Snedeker adapted the 9" pattern to create a "pocket and insert" style pad, cutting the top and bottom off the template to form the pockets:
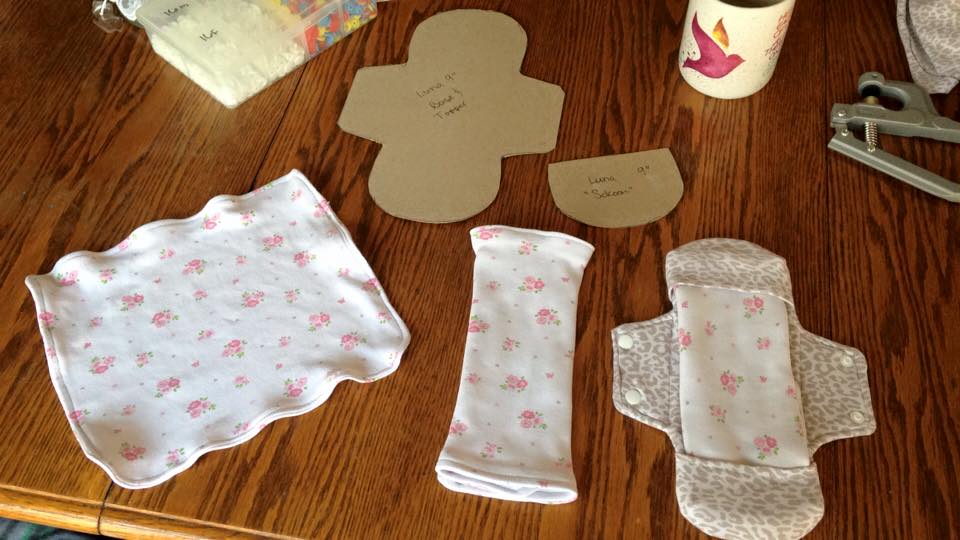


She repurposed an old swaddle blanket for the foldable inserts.  You could also make a couple of serged cores to use as inserts, and vary the number used to increase/decrease absorbency.  I can see this working really well for a heavy flow if you used PUL backing, and instead of changing the whole pad, you could just change or refold the insert.  I want to make a couple of these to wear to work on my heavy days so I don't have to fit a whole load of AIOs in my bag, just a few inserts.  I'm really looking forward to trying this!  (Picture by Siena Snedeker.)

Thank you so much ladies for letting me use your images and share these cool ideas!

Sunday, 23 August 2015

Tutorial: How to make a pad with an overlocked (serged) exposed core

Exposed cores are a great way of adding a bit of variety to your pad stash.  You may have already seen my tutorial for a 4-layer exposed core pantiliner.  This tutorial is for a heavier duty pad with an exposed core.  Unlike the pantiliner tutorial, you do not stitch through the whole pad when adding the exposed core.  This prevents blood from wicking through the stitches and going through your pad.  I'm using polar fleece as a backing in this tutorial, but PUL would work great too.


This post assumes that you have already downloaded and are familiar with the Luna Wolf patterns/tutorial set with templates and instructions - if not, you can find it here.

First, cut out the layers of fabric you will be using for your core.  I do this by cutting out rectangles just slightly bigger than my core template.  Here, I have used two layers of bamboo fleece and one layer of patterened flannel. 


Stack these pieces of fabric, making sure that the fabric you want on the top is right side up.  Pin in the centre - you don't want the pins anywhere near the edges where the overlocker will be cutting.


Draw around your core template with a water-erasable or air-erasable pen.  This line will be visible on the finished pad, so you will want something that will wash out.


Using the line as a guide, overlock/serge around your core.  Don't worry about the tail, as this can be tucked in underneath the core later.  If you don't have an overlocker, you can use zigzag stitch just inside the line, and then trim the excess fabric with scissors (see the Luna Wolf patterns/tutorial set for instructions/photographs).


Cut out your backing pieces.  I used flannel on the top, and polar fleece on the bottom.  Pin your core right side up to the right side of the piece you want facing upwards - in my case, the blue flannel - tucking the tail underneath.  Stitch the core to this piece only.  I stitched around the edge of the core, just inside the overlock stitch.  Now place your topping and backing fabrics right sides together.  The core will be sandwiched inside.


Sew the topping and backing pieces together as per the Luna Wolf tutorial, leaving a space to turn.  Trim the seam allowance, leaving it longer at your turning space.  Turn the pad right side out, using a knitting needle, chopstick or similar to tease out the corners.  The core is now sitting on top of your pad.  Tuck in the fabric at the turning space, and press.

Topstitch the pad as per the Luna Wolf tutorial.  The trick to this is to keep the foot over the core (see photo below).  If the foot goes underneath, it will bump against the stitches and throw off your line.


Add fastenings, and enjoy your new exposed core pad!


I hope you found this tutorial helpful.  Here are my other tutorials:

Sewing along a guide line
How to make the Luna Wolf patterns longer
How to make a 4-layer exposed core pantiliner

Tutorial: How to make a 4-layer, exposed core pantiliner

The Luna Wolf cloth pad patterns feature hidden cores, but exposed cores are a nice way to mix things up a bit!  Here's how to make a four layer pantiliner with a turned and topstitched core.  (For heavier exposed core pads, please see my tutorial for serged/overlocked exposed cores).


I have used flannel for this liner, and it is suitable for everyday wear, very light flow/spotting, or cup/tampon/sponge backup.  I have used the 8.5 inch pad template, as I prefer slightly bigger liners.

Here's how to make it!

(This post assumes that you have already downloaded the Luna Wolf patterns/tutorial set with templates and instructions - if not, you can find it here.)

Place your core template on the wrong side of your core fabric, and draw around it.  Cut out your core shape half an inch or so outside of your drawn line.  Here is what you should end up with:


Repeat, so that you have a piece of fabric for the back of your core.  Pin these two pieces of fabric right sides together.  On a straight-ish part of the core, mark where your turning space will be.  This should be about 1.5 inches.


Now cut out your backing pieces, and pin these right sides together.


Sew the two core pieces together, and sew the two backing pieces together.  Make sure you leave a turning space.  Trim seam allowance, leaving it a little longer at the turning spaces.  Here's what you'll end up with:


Turn, using a knitting needle or chopstick (or whatever you can find!) to tease out the corners.  Tuck in the fabric at the turning space.  Press, press, press!


Now topstitch the backing part of your pantiliner- the part with the wings.  It'll look like this on both sides:


Pin your core to the centre of your pantiliner:


Now topstitch your core, attaching it to the backing.  You will be stitching through the whole pantiliner.  Add snaps (or alternative fastenings of your choice) and enjoy!


Here's the back of the liner... being all flannel it's reversible, so you can wear it this way around as well!


I hope you found this tutorial helpful.  Here are my other tutorials:

Sewing along a guide line
How to make the Luna Wolf patterns longer
How to make a pad with an overlocked (serged) exposed core

Tutorial: Sewing Along a Guide Line

Most sewing patterns include seam allowance, so that you draw around a template that is larger than your finished item, cut the fabric out on this line, and then sew a specified distance in from the edge of the fabric.  Or you pin the pattern to your fabric and cut around the pattern pieces.

However, pads are often more intricately shaped than other sewn items, and you may find it easier to sew along a pre-drawn line.  If you're having trouble getting your pads looking neat and symmetrical, try this method:

(This post assumes that you have already downloaded the Luna Wolf patterns/tutorial set with templates and instructions - if not, you can find it here.)

First, cut out your template.  However, instead of cutting along the outer line, cut along the inner line.  The template will be the exact size and shape of your finished pad.  In the picture below, I have made a template on clear plastic so I can see the fabric underneath.  Place the template on the wrong side of your topping fabric and draw around it.


Now cut out your pad shape half an inch or so outside of your drawn line.  This is how it will look when you have finished - obviously it will be bigger than your template.


Attach your core to the wrong side of your topping fabric as normal.  The drawn outline will help you centre it.


Cut out your backing fabric, making sure to add seam allowance if you're using the same template.  (You could always print two copies of the templates, and cut out one set on the cutting line, and one set on the sewing line.)  Place the wrong sides together as normal, and pin in place.  Now when you come to sew the pieces together, you will have a nice ink line as a sewing guide.


Tip:  If you find the core is getting in the way and preventing you from turning the corners tightly enough, try using a zipper foot.

Complete your pad as per the Luna Wolf Tutorial - trim seam allowance, turn, press, and topstitch.  Add fastenings and enjoy your pad!


I hope you found this tutorial helpful.  Here are my other cloth pad tutorials:

How to make the Luna Wolf patterns longer
How to make a 4-layer, exposed core pantiliner
How to make a pad with an overlocked (serged) exposed core

Saturday, 15 August 2015

Tutorial: How to make the Luna Wolf patterns longer

A few people have told me that they love the Luna Wolf patterns, but wish they came in larger sizes.  While the largest pattern I have available is 11.75 inches, it is very easy to adjust this to make it longer!  This should work with most pad patterns where the wings are fairly well defined.  Here's how to do it:

Step 1:  Print out the pattern pieces for the 11.75 inch pad (or whatever pattern you would like to adjust), and assemble.


Step 2:  Make two horizontal cuts in the pad template, one above and one below the wings.  Your template will now be in three pieces.


Step 3:  Lay your pattern pieces on the piece of card or paper that will be your new template.  Making sure to keep the pieces lined up, space them apart to create a longer pad shape.


Step 4:  Draw around the outside of your template, connecting the lines so that they follow the curves of the pattern.  (You may wish to use paperweights or masking tape to hold your pieces in place.) Cut out your new altered template.


Step 5:  Repeat the process with the core - for this, you will only need to make one horizontal cut.


Now your template is complete and you're ready to start sewing!  Just follow the tutorial as normal.

Using this technique to lengthen the pattern means that you keep the proportions of the wings and gusset, and only the length is altered.

Happy sewing!

I hope you found this tutorial helpful.  Here are my other tutorials:

How to make a pad with an overlocked (serged) exposed core
How to make a 4-layer exposed core pantiliner
Sewing along a guide line

Monday, 27 July 2015

Success! (Partial)

Great news!  I heard back from Etsy's legal team, and they have removed the infringing listing from Happy Moon Pads' Etsy shop.  Thank you to Danny for dealing with it.

Happy Moon Pads could of course list it again, which she has done in the past, but she has a record now... and Etsy's policy is to "remove and discontinue service to repeat offenders".

I will be keeping a close eye on her Etsy shop, and will be watching Etsy in general in case she decides to open up another shop under a different name.  But for now the main listing is GONE, justice prevails, and I am happy. :)

[Edit 1: I found another infringing listing in her shop - the 11.75 inch pattern which she is attempting to sell separately - so I have reported that to Etsy's legal team also.]

[Edit 2:  The second infringing listing has been removed by Etsy!]

Thursday, 23 July 2015

Luna Wolf Patterns Now Available For FREE!

What a week it's been at Luna Wolf HQ!

As you may know from my previous blog posts, I have been having problems with the ongoing theft of my patterns/tutorial set by an Etsy seller going by the name of Happy Moon Pads.  She bought the pattern/tutorial set on 19 April 2014, and shortly afterwards started selling it on Etsy and on her own site, with her business details inserted in place of mine.  She claimed full credit for the 15 page PDF file, even selling a $25 licence for people to sell pads made from the patterns, as long as credit was given to her shop. (You do not need a licence to sell items made from a sewing pattern - this is bogus.)

I reported this brazen theft of intellectual property to Etsy, as did several other people, but Etsy weren't interested.  Happy Moon Pads altered the listing photo to make it slightly less identical, but a year later the original listing is back on Etsy, and people are still unwittingly buying it.

Meanwhile, I had been having terrible problems with my website after attempting to migrate it, and could not get my shopping cart set up correctly to sell the tutorial anymore.  Happy Moon Pads was profiting from my work, and my site was too broken to sell it myself.  Even if I did manage to fix the shopping cart, or broke my Etsy boycott and listed the pattern/tutorial on Etsy myself, I knew that whatever I priced it, she would undercut it and continue to rip me off - and frankly I don't have the time or energy to continue pursuing her.

After much deliberation, I decided the best way forward would be to offer the pattern/tutorial set for free, or for a small optional donation. This is the best way I can think of to stop her from profiting from my work.  You can't undercut free. I have done a complete revamp of my website (the broken shopping cart is gone!), and you can now download both the A4 and US letter versions of the tutorial, plus templates for wider versions of the pantiliner and 8.5 inch pad.  There is a donation button on the website if you like the patterns and want to say thanks. (A massive thank you from me to the people who have already donated!)

Here are the free patterns!

A4 version
US letter version
Wider versions of the pantiliner and 8.5 inch pad

You can help by sharing the pattern/tutorial set with its Luna Wolf branding far and wide, and speaking up if you see it being sold on and/or claimed as somebody else’s. I am happy to provide the original high resolution photographs from the tutorial photoshoot (including the many that didnt make it in!), photographs of the original patterns drafted on cardboard, screenshots of the original tutorial files on my PC date stamped 2009, a screenshot of the Paypal transcation from 19 April 2014 when Samantha Hughes (AKA Happy Moon Pads) purchased the pattern from Luna Wolf, or whatever else it takes to prove this is my work.

If you have previously bought this pattern from Happy Moon Pads without realising it was stolen property, I suggest opening a dispute with Etsy and/or Paypal, although I have little faith in the former.

I have been overwhelmed by the support I have had from the cloth pad community. I wasn't sure how people would react to seeing a pattern they had previously paid for become available for free, but generally people have completely understood and supported my decision, and I am so grateful for that.

Saturday, 2 August 2014

Update on Happy Moon Pads Infringement

As mentioned in my previous entry, an Etsy seller going by the name of Happy Moon Pads was attempting to sell the Luna Wolf cloth pad pattern and tutorial set as her own work.  She was also selling a licence for people to sell items made from my pattern/tutorial set, as long as credit was given to her.

I have evidence of my ownership of this pattern/tutorial set dating back to 2009, when it was created.  The patterns themselves were hand drafted in 2008.  Happy Moon Pads did not exist until 2011, according to her own slogan - "Brightening periods since 2011".

I reported the listing to Etsy, as did several of my friends.  I never did hear anything back from Etsy, which was disappointing, but the offending listing was removed.

Good news, right?  Well, I thought so, until I realised that she'd created another listing.  Different picture, a few edits, but still my text word-for-word in the description.  I have reported the new listing to Esty.  I have yet to determine whether the downloadable product is my work, as that would involve BUYING it, and the thought of giving money to Happy Moon Pads to access my own work makes me feel sick.  I think I'm going to have to bite the bullet and do it though, to ensure I have the evidence I need.

The licence is still for sale, relating to the "new" patterns.

She also has the same listing on her own web site, which I have reported to her web host.

I'm obviously upset (and furious) that this has happened, but equally I have been bowled over by the support of my friends and customers who have added their own complaints to Etsy, and helped spread the word.  Thank you to all of you.

Wednesday, 30 July 2014

Rip-off of Luna Wolf pad patterns and tutorial set

Hi everyone,

It has been brought to my attention that the pattern and tutorial set I created in 2008/9, and still sell through my website today, has been ripped off by an Etsy seller called "Happy Moon Pads".

This is my original pattern and tutorial set:


You can see from the picture that the text on the pattern reads "Copyright Luna Wolf 2008. For personal or non profit use only."

This is the ripped off pattern: [EDIT: this has now been removed and replaced with a different listing - see following update post.]

Screenshots (click to enlarge):


As you can see, it is identical, but the text pertaining to Luna Wolf has been removed. Her price also undercuts mine.  Unbelievably, she is also selling a licence which enables the buyer to sell pads made FROM MY PATTERNS - as long as they give credit to HER SHOP!

PLEASE DO NOT PURCHASE THIS PATTERN/TUTORIAL SET FROM HAPPY MOON PADS! This is MY work, for which I can provide the original hand-drafted patterns if anybody would like to see them.  Please do not give your money to somebody who is making money dishonestly off of somebody else's hard work and creativity.

Etsy has been notified.

Thanks for reading.

Vicky

Friday, 9 March 2012

Karmic Cloth pads on sale at Luna Wolf

A couple of years ago, I started a sister pad company called Karmic Cloth. The idea was to create a line of pads that would be easier to make (but still equally high quality), to supply to local health food shops. Unfortunately the idea never really took off - I think our small market town wasn't quite ready for it - and as a result I have a lot of lovely pads that are just sitting around doing nothing.

Rather than let them languish in a cupboard, I've added them to the Luna Wolf website under their own category, at a deeply disounted price. They are very different to Luna Wolf pads, but don't let that put you off. It's a case of French knickers vs bikini bottoms - different cuts, but they do the same thing. The Karmic Cloth pads I have in my stash get used every month without fail, and I expect I will be pinching a few more of them.

Here's a sneak preview:


I hope you enjoy them!

Monday, 6 February 2012

Taking an indefinite break

Hi folks! I hope you're all doing well.

The title of this post says it all, really. As of today, I will no longer be making Luna Wolf cloth pads. The pads that have just been uploaded will be the last Luna Wolf pads available for sale. (I won't say "EVER!", because that sounds a bit melodramatic, but at least for the forseeable future.)

Why am I winding down Luna Wolf? A few reasons, but first and foremost because I've been doing this for almost five years now, and I'm ready for a change. I've made about 2000 pads during the time Luna Wolf has been open. That's a lot of hours cutting, sewing, photographing and uploading. I've introduced new designs, written a tutorial, sold fabric/menstrual cups/pouches, hosted giveaways, and written articles. I've loved every minute of it, but I'm starting to burn out. After fighting it for a while, I finally came to the conclusion that it's time to close this door and open a new one.

The secondary reason for closing Luna Wolf is that my supplies have gone up in price significantly the last couple of years. Not just fabric, but electricity, sewing machine needles, thread, etc. I can't make a living from pad-making anymore unless I hike my prices way up, and I wouldn't feel right asking £8 for a day pad. (Of course the other option is to become a pad-making superwoman and churn out 30 pads a day, but the reality is that on a good day, I average five pads.)

A few weeks ago I started working as a freelance audio transcriber, and I'm really enjoying the work. The files I transcribe are often very intresting, and I also get to use two of my favourite skills: touch-typing, and correcting people's grammar. ;) I'd like to get certified in medical terminology, and maybe eventually get an administrative position in a hospital.

I have really enjoyed creating and building up Luna Wolf. It's been a fantastic learning experience, and it's allowed me to meet some wonderful people - customers, suppliers, bloggers, and fellow crafters alike. Luna Wolf is also responsible for putting me on a Prince's Trust training course, and meeting one of my very favourite people - my good friend Gemma. I wouldn't change a minute of it.

So how will this work? As stock dwindles, I will condense all the Luna Wolf pads into one category so they're easier to find. I will also continue to offer the Karmic Cloth pads on sale until they're all gone. (I have a bunch of those still to sew up.) The bamboo fleece will stay up until it's all gone; ditto the pouches and cups. I intend to keep the site live so that I can continue selling the patterns/tutorial, and will add some links to other pad sellers that I recommend. I may sell off some of my quilter's cotton and poly fleece - it depends whether or not I can bear to part with it. I certainly do have a lot of it! As always, I will keep you posted.

Thank you to everyone who has supported Luna Wolf over the years. Whether you've spent your hard-earned money on pads, "liked" me on Facebook, been a reliable supplier, or just read my ramblings on this blog, it means more to me than you will ever know.

- Vicky

Monday, 31 October 2011

And now for something completely different! Waterproof pouches, and tube pads

Luna Wolf has an exciting new addition to the shop - waterproof pad pouches!


These beauties are handmade by the lovely Sarah from AngelPadz, and come in large and small sizes. The large size holds approximately 4 medium pads, and is perfect for storing your pads when out and about. It would also be a very attractive make-up or toiletry bag! The small size holds a single liner or medium pad, and fits discreetly into a handbag or pocket. It's great for carrying a spare pad around.

Both sizes are made from quilter's cotton and lined with PUL. The large pouches fasten with zips, and the small ones with snaps. They are available in the new Waterproof Pouches category, and I expect to be ordering many more of them in future!

On a different subject entirely, I have a friend who runs a charity for poorly children. This weekend she received a request for some cloth "tube pads", and is looking for volunteers to sew some. Kids with tubes and buttons often experience leakage, which irritates their skin and makes them sore. They then end up having to wear medical dressings that are uncomfortable, not to mention boring!

Cloth tube pads are very quick and easy to make, and are a great way of using up scraps of fabric. You can find instructions here. I used three layers of flannel for the first few, and one layer of flannel plus one layer of bamboo fleece for the rest.


If you find yourself with an hour to spare, why not whip a few up and send them over to Vikki at Post Pals?

Tuesday, 2 August 2011

Disposables, Reusables and Guilt

I frequent a number of cloth pad communities (yes, there are communities dedicated to cloth pads!), and every so often, somebody will talk about the guilt they felt (or feel) about using disposable pads.

This makes me sad.

There are lots of reasons to switch to cloth pads - including a desire to minimise your impact on the environment - but guilt should not be one of them. Finding cloth more comfortable than disposables, or being attracted by pretty fabrics are equally legitimate reasons. How you deal with your period should always be your choice, and nobody should feel guilt-tripped into using (or not using) a certain product.

We women already have enough guilt inflicted on us by the unrealistic standards touted by the media. We do not need guilt about our choice of menstrual products added to this load. The right choice of menstrual protection is whatever works best for you, be it disposable or reusable. If anyone tries to tell you otherwise, remind them that your body is nobody's business but yours.

Thursday, 21 July 2011

July Giveaway: Winner!

Thanks so much to everyone who entered the giveaway!

Without further ado, the winner is... eatswithfork! Congratulations! Your email address suggests that your name is Kacie, so well done Kacie, I hope you enjoy your Earthy Batik pad and booster.

Commiserations to those of you who missed out - maybe the next giveaway will be your turn to win.

Hope you all have a great weekend!

Tuesday, 19 July 2011

Summer Giveaway

Yesterday my Facebook page hit 100 "likes", which means it's giveaway time! Thanks so much to everyone who's "liked" the page (I have to put that in quotation marks otherwise it's terrible grammar!) - I love reading your comments and chatting with you.

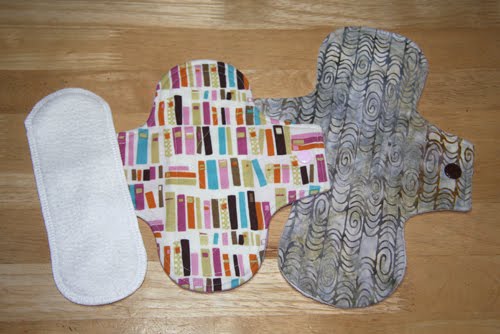
So, who'd like to win a free pad? The winner of this giveaway will get to choose one of these two pads, and will also receive a handy PUL booster (on the left):

Centre: Book Addict pantiliner, 7.5" long, 2.5" wide when fastened. Backed with light pink microfleece. Suitable for light flow, spotting, or as backup for a menstrual cup or tampon.

Right: Earthy Batik pad, 9" long, 2.6" wide when fastened. Backed with cream fleece. Suitable for medium flow.

To enter, simply comment on this blog post and tell me which pad you would like to win. At 5pm GMT on Thursday 21st July, I will use the random number generator to pick the winning comment. Don't forget to leave an email address so that I can contact you!

Please leave one comment only - multiple entries will be disqualified. As always, international entries are welcome. Good luck, and have fun!

Sunday, 10 July 2011

Fabric Binge

A few months back I did some temping for a local newspaper, and I promised my Facebook followers that as soon as the money came through, I'd have a fabric binge. Well, after four months of waiting the cash finally showed up in my bank account... and I headed over to Castle Court Quilter so fast that my feet barely touched the ground.

My fabric haul, in a neat pile of loveliness. Almost too pretty to cut up. Almost.

Swallows on blue and sage, and a corresponding blue, white and sage print. These are all from the Floragaphix range that has been so popular.

Bright florals are always a joy to work with. And they make very cheery pads!

Birds and books.

More batiks, as requested. The batik range is small, but I liked this earthy design and the vibrant red floral.

The ever popular "Gypsy" print, this time in bright red. Should look fabulous with black fleece and snaps.

A couple of old favourites that I'd run out of.

Finally, how organised is this?

A print for this year's holiday pads. Hey, I said HOLIDAY, I didn't even mention the C word! This will sit in my cabinet until November, and until then we will speak of it no more.

Speaking of Facebook, I'm 7 "likes" away from 100. It's very exciting! To show how much your support means to me, I will hold another giveaway as soon as I reach triple figures. If you haven't already liked my Facebook page, please do - the sooner I reach my target, the sooner you get a chance to win a free pad! (That's a menstrual pad, not an iPad. Sorry, you can't play Angry Birds on it.)